What is a unikernel and why do we need it?
Before we look at unikernels, let us first understand why we need something like unikernels in the first place, and examine the limitations of current operating systems like Linux and Windows that lead us to look for alternatives. Traditional operating systems are designed to run multiple applications simultaneously, which requires careful resource management to ensure smooth operation. The operating system kernel also performs numerous background tasks via memory management, process scheduling, disk I/O and peripheral management. However, our backend applications often do not need these functions, and yet the kernel consumes a lot of memory and CPU power to support them. The solution to the above problem is simple: if the operating system causes too much overhead, why not let the user-space program take control of the hardware directly? This way, the application essentially becomes part of the kernel, accesses the hardware with fewer obstacles and significantly reduces the overhead of the operating system. This is exactly the goal of unikernels — fine-tuning for specific tasks. They are lightweight, specialized virtual machines designed to run a single application, making the system smaller, faster and more secure. This unique form of virtualization merges the application and operating system into a single executable image, eliminating the need for the extensive features and services of traditional operating systems. This specialization makes the system simpler and reduces resource consumption. It only contains the essential components required for the respective application and is, therefore, much smaller than conventional operating systems. This lean design leads to faster boot times and lower memory consumption. In addition, the smaller attack surface of unikernels also improves security. Since it is executed as a single process, there is no overhead from context switching between multiple processes, resulting in faster execution and lower latency. Once compiled, unikernels can be run on local devices on Linux with QEMU and even on various hypervisors such as Xen, KVM, Nitro System and ESXi. These hypervisors handle the interaction with the underlying hardware, allowing unikernels to benefit from virtualization without the overhead of a full operating system. The following block diagram will help you to better understand and visualize the whole thing.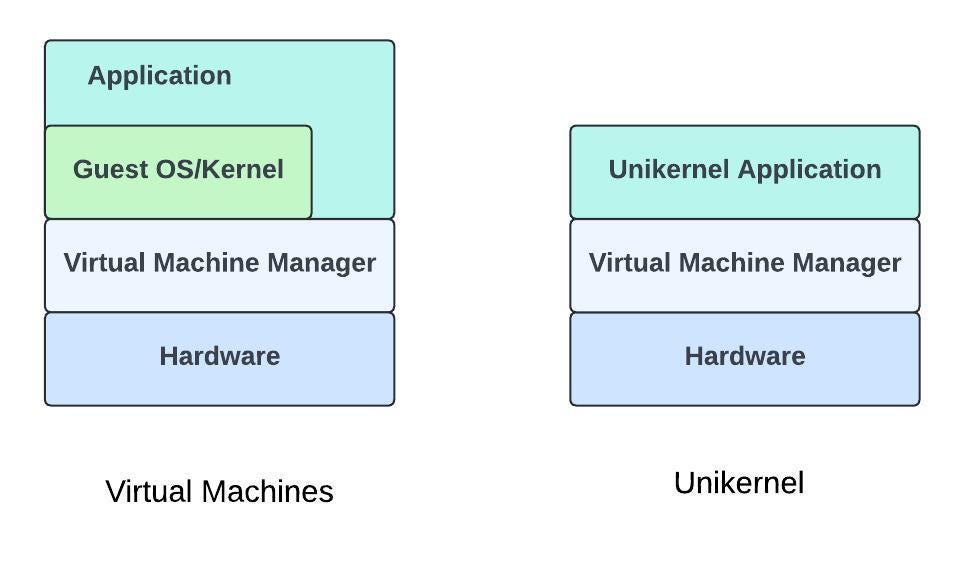
Types of unikernel
Recently, we reached out to several unikernel teams for one of our projects, but only received a few responses. After investigating some of the unikernels, we realized that only two — Nanos and Unikraft — are on the path to stability. Although conceptually both have the same basic principle, they have their own methods for deploying unikernel images and instances. The main differences between the two unikernels are listed in the table below. However, one of the main differences between Unikraft and Nanos is that Unikraft relies more on its own cloud structure called Unikraft Cloud (which is ultimately based on a bare metal instance) for better performance, while Nanos offers the ability to create its own image that can run on all instance types on all cloud providers supported by Nanos.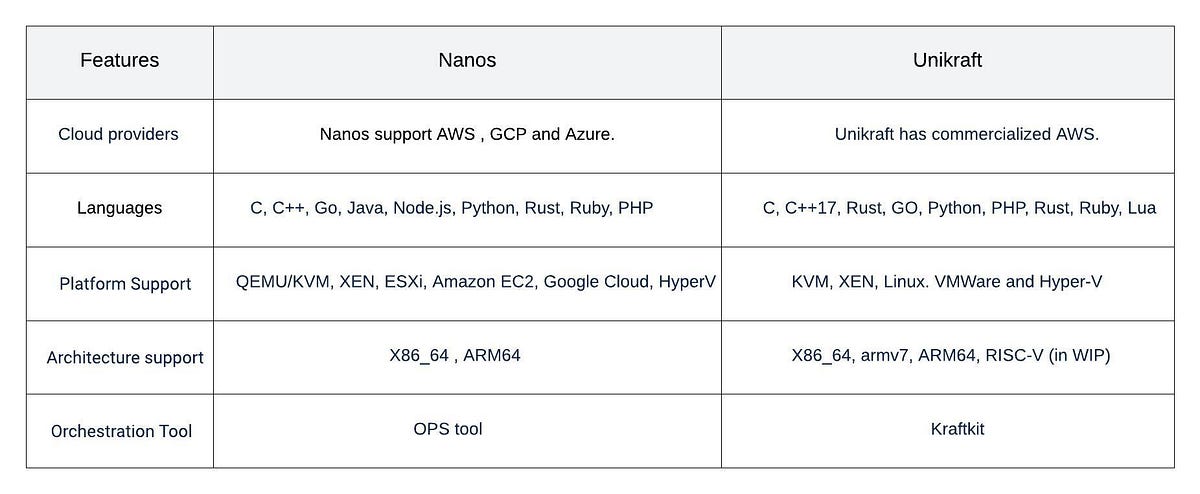
Building Nanos unikernel (step-by-step instructions)
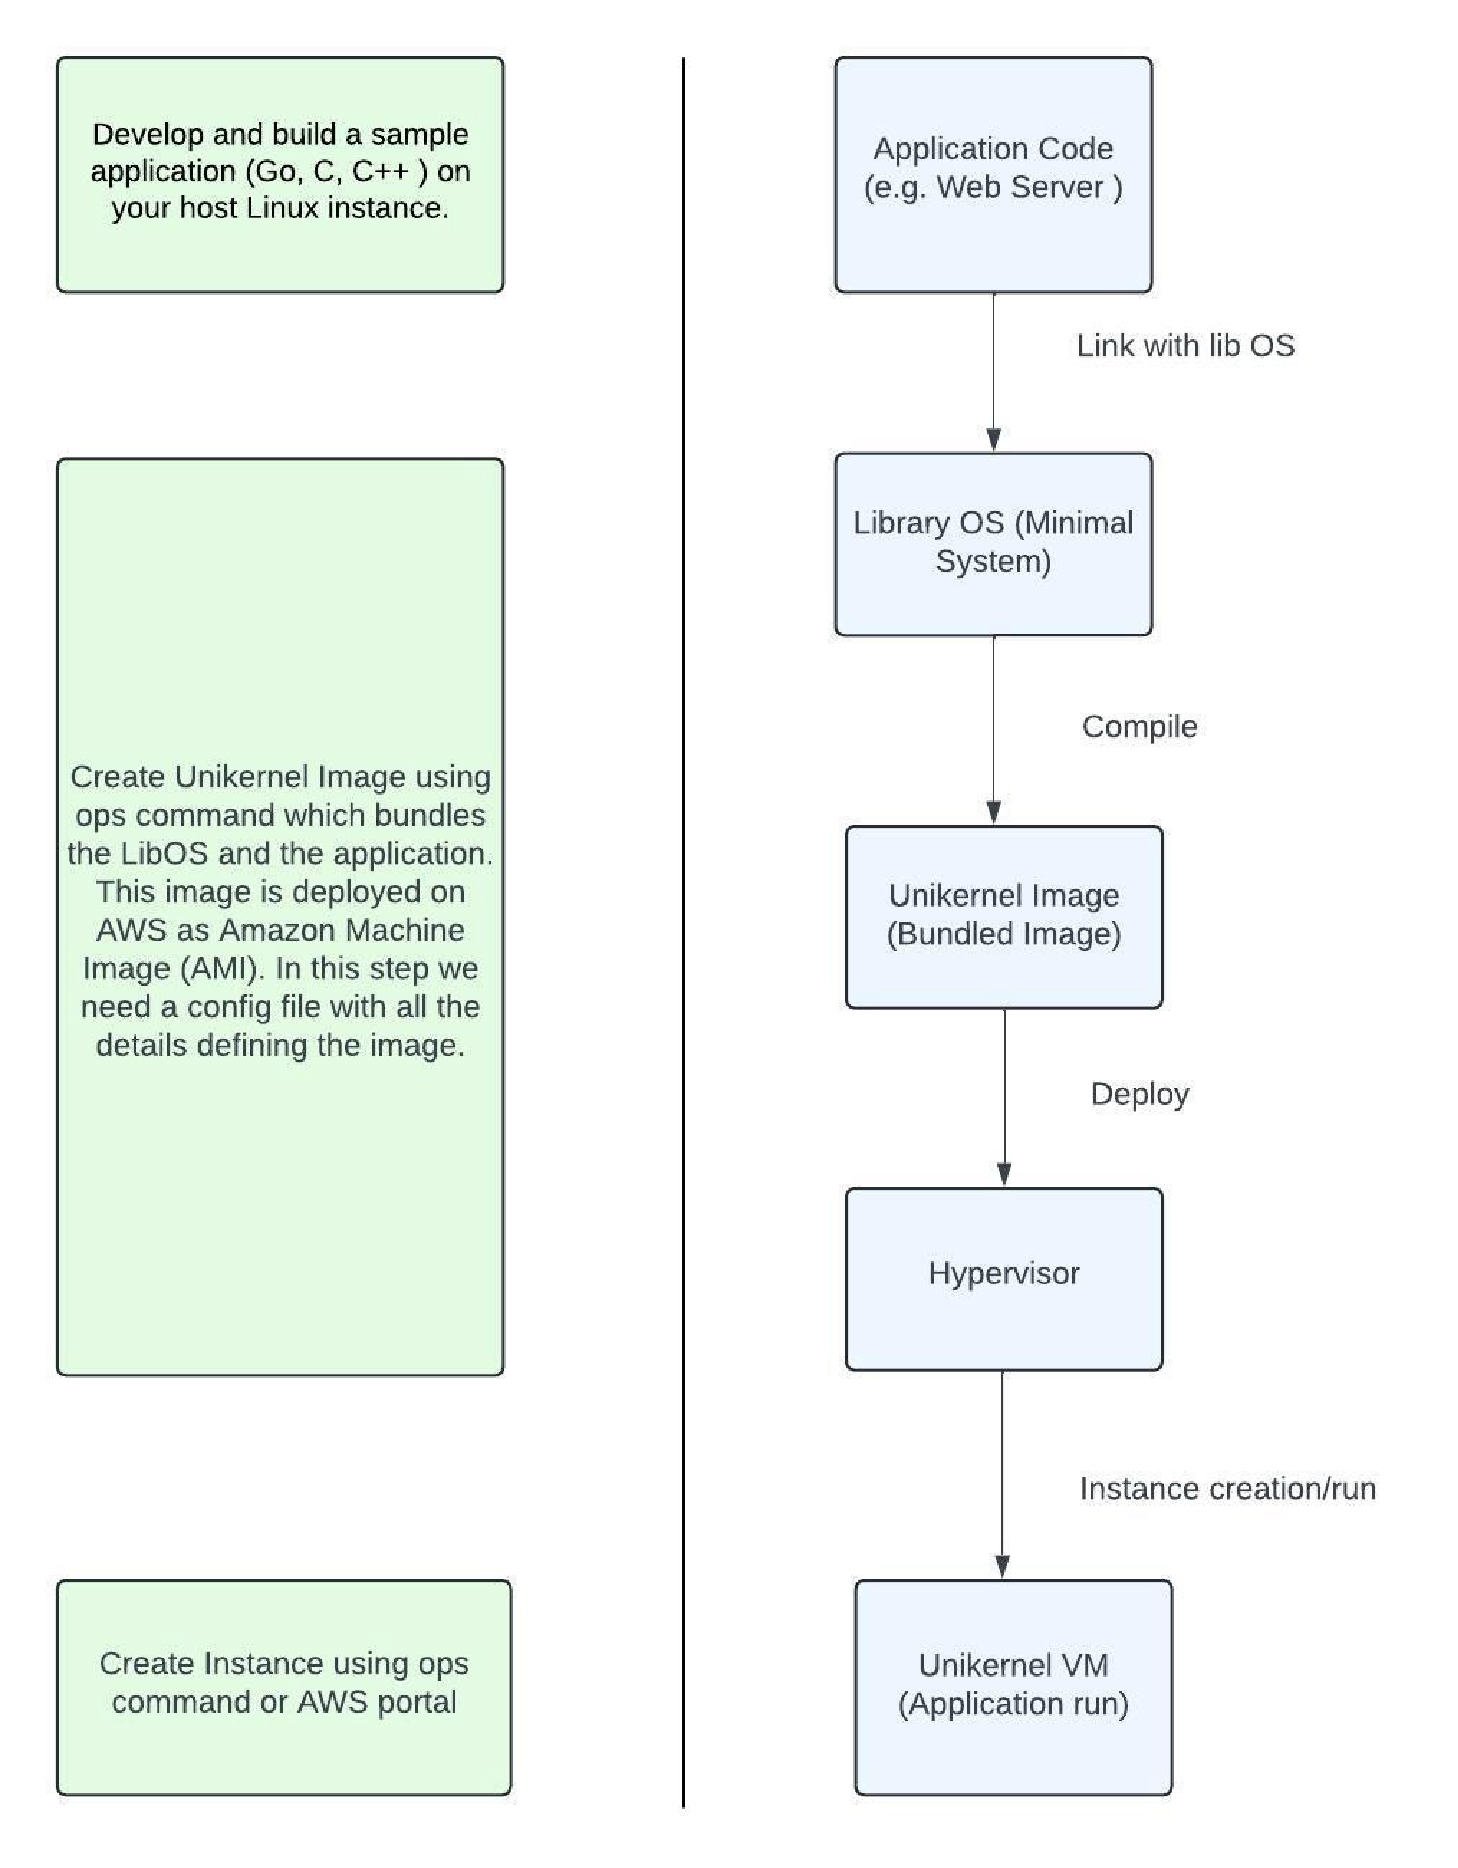
We have mentioned about Unikraft, but let’s leave that aside for now and concentrate on nanos. Creating a Nanos unikernel involves several steps, from setting up the environment to deploying the final image and instance. In addition, Nanos uses an operational tool called OPS that streamlines various tasks, such as image and instance creation. Before we get into creating images and instances, we first need to build both Nanos and the OPS tool from source code. Alternatively, we could also use pre-built versions of OPS and Nanos to run our application (refer nanovms). However, in this article, we will focus on building Nanos and OPS from source code.Build OPS and Nanos
Here is a simple step-by-step guide to help you create the OPS and Nanos code from scratch (source: nanovm ):- The very first step is to set up a Linux computer as a host computer for various operational tasks. This can either be a local Linux computer on site or an AWS virtual machine.
sudo apt-get remove golang-go
 sudo apt-get remove --auto-remove golang-go
 sudo apt-get update
 sudo rm -rf /usr/local/go

 # Download the latest go version (above 1.22.1)
 wget https://go.dev/dl/go1.22.1.linux-amd64.tar.gz

 # Unzip the downloaded tar file
 sudo tar -C /usr/local -xzf ~//go*.linux-amd64.tar.gz

 # Set the path
 export PATH=$PATH:/usr/local/go/bin

 # Before we install GCC, update the packet list
 sudo apt-get update

 # Install GCC
 sudo apt-get install gcc

 # Verify the GCC Installation
 gcc --version

 # Install make
 sudo apt-get install make
# Below path should be present in the Linux machine path.
export PATH=$PATH:/usr/local/go/bin
  # Command to clone the source code
git clone https://github.com/nanovms/ops.git
  # Installs dependencies for ops
make deps

# Generates protobuf files.
make generate

# Build the ops tool, which generates Ops binary.
make build
  # Copy OPS binary
cp ops ~/.ops/bin/ops

# Update the path
export PATH=$PATH:/home/ubuntu/.ops/bin
go build
  # Clone Nanos code.
git clone https://github.com/nanovms/nanos.git

# Build nanos code.
make
  # Copy the post build files.
cp output/platform/pc/boot/boot.img ~/.ops/0.1.xx/.
cp output/platform/pc/bin/kernel.img ~/.ops/0.1.xx/.
cp output/tools/bin/mkfs ~/.ops/0.1.xx/.
cp -r output/klib/bin/* ~/.ops/0.1.xx/klibs/.
  # Run the below command to configure your AWS credentials.
aws configure

# Enter Access Key ID
AWS Access Key ID:

# Enter Secret Access Key
AWS Secret Access Key:

# Region details
Default region name [ap-south-1]:

# Output format
Default output format [None]:

# Install AWSCLI
sudo apt install awscli

# Run the following command to create a sample bucket on ap-south-1 region.
aws s3api create-bucket --bucket --region ap-south-1
Create image and instance
- Below is an example of the image configuration file. The detailed configuration of the OPS tool can be found under this link: Ops documentation:
Sample command for creating an image.
# Image Config file { "Args": ["./sample application"], "CloudConfig" :{ "Platform" :"aws", "ProjectID" :"", "Zone":"" "BucketName":"",Once the image has been successfully created, it would look like this:ops image create -c -i -t awsubuntu@ip-172-22-0-132:~/testing/testing$ ops image create -c instancenew.json -t aws -i unikernel_image file1 100% |███████████████████████████████████████████████████████████████████████████████████████████████████████████████████████████████████████████████████████| (4098/4098, 399 it/s) aws image 'unikernel_image' created... - Example of an instance configuration file.
Sample command for creating an instance.
# Instance config file { "CloudConfig" :{ "Platform" :"aws", "ProjectID" :"", "flavor":"", "Zone":"", "VPC": "", "Subnet":"" }, "RunConfig": { "Ports":["80","443","8080"] } }A successful instance creation would look like this:ops instance create -c -i -t awsHere you can see an example of a successfully deployed and running nanos application on AWS (Running instance).ubuntu@ip-172-22-0-132:~/testing/testing$ ops instance create -i unikernel_instance Unikernel_image -t aws -c instancenew.json Created security group sg-0f6b9bc85c2df01e3 with VPC vpc-3a45dc53. aws instance 'unikernel_instance' created...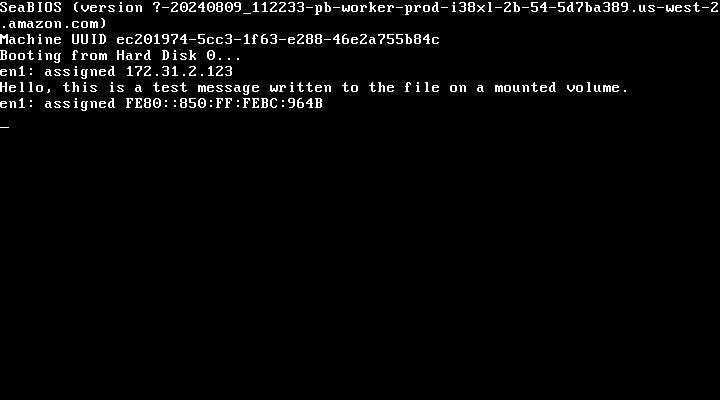
- Alternatively, we can use QEMU to run the Nanos image on our local Linux.


